因为要涉及到重新置换以前的硬件操作方案,在重新梳理以前项目后,发现使用的语言繁多,其中使用到了一种公司内部开发的脚本,从易读性和功能性上来看,出于减负的目的,将这些个能被替换的语言,尽量统一到一种语言——Go。

同时,在使用过程中,Go里面的USB库能找到的使用方面的博客少的可怜,于是写下这一篇操作USB详细的使用解析,方便后来人,避免遇到一知半解的问题。

像一些USB设备,都是串接在一个arm设备上进行管理,然后由arm设备进行状态控制。(这里有点疑惑以前的方案为啥要使用USB,一般情况这种一对多的,使用像485组网大概会更方便些,算是一个更有性价比的方案,当然现在的方案是不可能变动的了。)

准备

gousb

Go操作USB使用到的库是gousb,不过在使用过程中,库不支持USB的热插拔event,在这个issue中有coder完成了这项功能,在这里贴上。感谢作者nkovacs。当然作者提交了pr,当被拒绝了,主要是维护者认为库的注册方式是链式调用函数,他们认为在Go中不太常使用,更为常见的是使用的是函数选择模式,这在我之前的博客有讲解过(竟然又见了)。

1
2
3
h := gousb.Hotplug().Enumerate().ProductID(0x1234).Register(func() {
...
})

因为主库没有合并这个特性,我们直接使用该特性即可,这里我讲主库与这个特性合并了。

libusb

很遗憾,这个库是一个Cgo库,也就是需要使用到C库,所以程序并不是一个无依赖,可直接单文件使用的库,这里我们需要安装库——libusb

安装:

1
2
3
4
5
6
// 准备条件
sudo apt-get install gcc
sudo apt-get install libudev-dev

// 进入安装包解压目录中,使用root权限编译
./configure && make && make install

若需要程序运行到其他平台,则需要配置交叉编译工具链。

1
2
sudo ./configure --build=i686-linux --host=arm-linux CC=/xxxx/xxxx-linux-gn
u-gcc CXX=/xxxx/xxxxx-linux-gnu-g++ --disable-udev

交叉编译中的udev我没有去编译了,要用到hotplug的话,此处是要使能的。

举个栗子

使用介绍可以参考GoDoc,这里头有两个简单的例子,若使用,则最好清楚函数的为何要填写这些数据。

直接上我写的一个例子,

1
2
3
4
5
6
7
8
9
10
11
12
13
14
15
16
17
18
19
20
21
22
23
24
25
26
27
28
29
30
31
32
33
34
35
36
37
38
39
40
41
42
43
44
45
46
47
48
49
50
51
52
53
54
55
56
57
58
59
60
61
62
63
64
65
66
67
68
69
70
71
72
// Initialize a new Context.
ctx := gousb.NewContext()
defer ctx.Close()

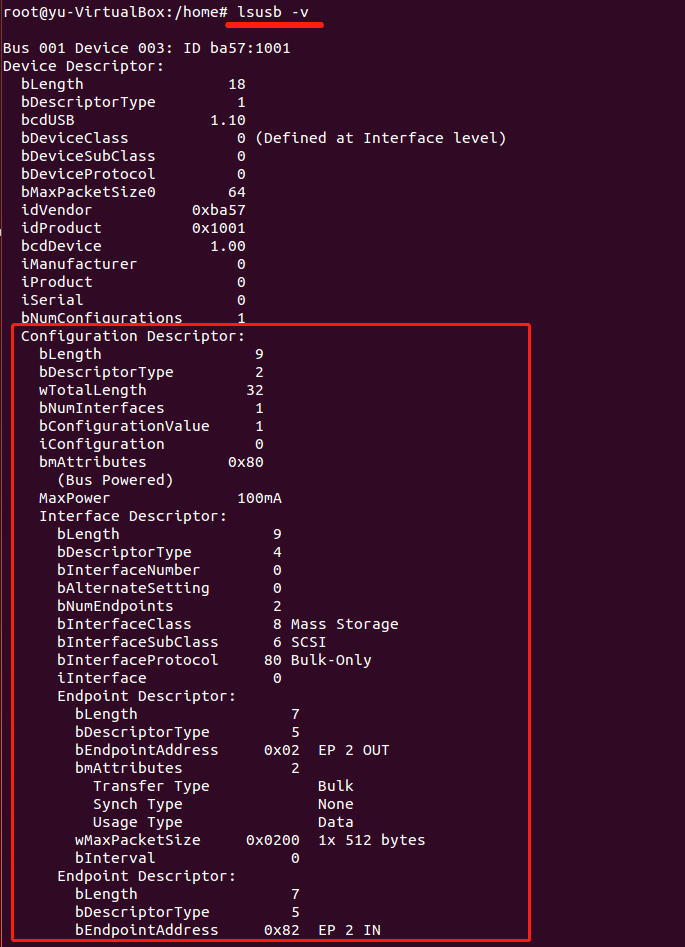
// Open any device with a given VID/PID using a convenience function.
dev, err := ctx.OpenDeviceWithVIDPID(0xba57, 0x1001)
if err != nil {
fmt.Println("Could not open a device: ", err)
return
}
defer dev.Close()

// Detach INTERFACE1 & INTERFACE2
fmt.Println("Set auto-detach")
if err := dev.SetAutoDetach(true); err != nil {
fmt.Printf("Failed to set auto-detach: %v", err)
return
}

// Switch the configuration to #1
cfg, err := dev.Config(1)
if err != nil {
fmt.Printf("%s.Config(1): %v \n", dev, err)
return
}
defer cfg.Close()

// In the config #1, claim interface #0 with alt setting #0.
intf, err := cfg.Interface(0, 0)
if err != nil {
fmt.Printf("%s.Interface(0, 0): %v \n", cfg, err)
return
}
defer intf.Close()

fmt.Println(intf.Setting.Endpoints)

// And in the same interface open endpoint #5 for writing.
epOut, err := intf.OutEndpoint(0x02)
if err != nil {
fmt.Printf("%s.OutEndpoint(0x02): %v", intf, err)
return
}
fmt.Println(epOut.String())

// In this interface open endpoint #6 for reading. 0x81
epIn, err := intf.InEndpoint(0x82)
if err != nil {
fmt.Printf("%s.InEndpoint(0x81): %v", intf, err)
return
}
fmt.Println(epIn.String())

// writeBytes might be smaller than the buffer size if an error occurred. writeBytes might be greater than zero even if err is not nil.
writes, err := epOut.Write([]byte(`{"xxx":"xxx"}\r`))
//writes, err := epOut.Write([]byte("123"))
if err != nil {
fmt.Println("Write returned an error:", err)
return
}
fmt.Println("write :", writes)

buf := make([]byte, 20)
readBytes, err := epIn.Read(buf)
if err != nil {
fmt.Println("Read returned an error:", err)
}
if readBytes == 0 {
fmt.Println("IN endpoint returned 0 bytes of data.")
return
}
fmt.Println("read :", readBytes, string(buf))

解析函数

  • gousb.NewContext()中的context:

Context管理与USB设备通信所需的所有资源。通过Context,用户可以遍历可用的USB设备。

  • OpenDeviceWithVIDPID

根据PID和VID打开设备,当设备不存在,则无法打开。还可以循环遍历设备进行打开设备操作。

1
2
3
4
5
6
7
8
9
10
11
12
13
// var devs []*gousb.Device

// OpenDevices is used to find the devices to open.
devs, err := ctx.OpenDevices(func(desc *gousb.DeviceDesc) bool {
// After inspecting the descriptor, return true or false depending on whether
// the device is "interesting" or not. Any descriptor for which true is returned
// opens a Device which is retuned in a slice (and must be subsequently closed).
if desc.Vendor == gousb.ID(xxxx) && desc.Product == gousb.ID(xxxx) {
log.Debugf("Found device: %v", desc)
return true
}
return false
})
  • SetAutoDetach

SetAutoDetach启用/禁用自动内核驱动程序分离。 启用auto-detach后,gousb将自动分离接口上的内核驱动程序,并在释放接口时重新挂接它。 默认情况下,在新打开的设备句柄上禁用自动内核驱动程序分离。

  • dev.Config(1)

获取配置描述符,这里涉及usb的一些概念,在usb中其实有很多描述符来配置usb的相关属性,和描述usb的相关特性,这里就是通过该函数去获取其中的配置描述符。可以在linux中使用lsusb命令查看到。
1563335549361

这些是概念,其中参数填1,我们还未搞清楚。

接下来,看代码,配置描述符是具象化在库中的结构体ConfigDesc

1
2
3
4
5
6
7
8
type ConfigDesc struct {
Number int
SelfPowered bool
RemoteWakeup bool
MaxPower Milliamperes
Interfaces []InterfaceDesc
iConfiguration int
}

而这些数据都在调用OpenDeviceWithVIDPID函数后,被读取到程序中,相应的配置描述符在dev.Desc.Configs中,该变量为map[int]ConfigDesc,而案例中,我只有一个配置描述符,且key1,所以在程序中直接就给定了。

  • cfg.Interface(0, 0)

程序需要透过操作系统的中间层USB controller interface,以此来和device进行交互操作。接口声明并返回USB设备上的接口。 num指定要声明的接口的编号,alt指定该接口的备用设置编号。若指定出错,库会打印出正确的配置信息。

这里的参数时怎么得来的呢

1
2
3
fmt.Println(len(cfg.Desc.Interfaces), cfg.Desc.Interfaces[0].String())

// 1 Interface 0 (1 alternate settings)

填入interface数组索引,引用其中的第一个alternate settings。根据实际设备上的参数可以得到(0, 0)的传参。

  • endpoint

usb中数据传输有个endpoint的概念,可以被认为类似于UDP / IP端口,但数据传输是单向的。端点由Endpoint结构表示,所有定义的端点都可以通过Interface.Setting的Endpoints字段获得。
调用函数返回的结构体中分别含有readwrite方法。

1
2
3
4
5
6
7
8
9
10
11
12
13
14
15
16
17
for epNum, endpoints := range st.intf.Setting.Endpoints {
if endpoints.Direction == gousb.EndpointDirectionOut {
st.output, err = st.intf.OutEndpoint(int(epNum))
if err != nil {
log.Error("set outpoint error,", err)
st.Close()
return err
}
} else {
st.input, err = st.intf.InEndpoint(int(epNum))
if err != nil {
log.Error("set inpoint error,", err)
st.Close()
return err
}
}
}
  • control函数:

这里提一下,USB传输可以分为四种传输方式:

1
2
3
4
5
6
7
8
9
传输方式
USB,有四种的传输方式,控制(Control),同步(isochronous),中断(interrupt),大量(bulk)。如果你是从硬件开始来设计整个的系统,你还要正确选择传输的方式,而作为一个驱动程序的书写者,就只需要弄清楚他是采用的什么工作方式就行了,通常所有的传输方式下的主动权都在PC边,也就是host边。
1、控制(Control)方式传输,控制传输是双向传输,数据量通常较小,USB系统软件用来主要进行查询,配置和给USB设备发送通用的命令,控制传输方式可以包括,8,16,32和64字节的数据,这依赖于设备和传输速度,控制传输典型地用在主计算机和USB外设之间的端点(Endpoint)0之间的传输,但是指定供应商的控制传输可能用到其它的端点。

2、同步(isochronous)方式传输,同步传输提供了确定的带宽和间隔时间(latency),它被用于时间严格并具有较强容错性的流数据传输,或者用于要求恒定的数据传输率的即时应用中,例如执行即时通话的网络电话应用时,使用同步传输模式是很好的选择,同步数据要求确定的带宽值和确定的最大传输次数,对于同步传输来说,即时的数据传递比完美的精度和数据的完整性更重要一些。

3、中断(interrupt)方式传输,中断方式传输主要用于定时查询设备是否有中断数据要传输设备的端点模式器的结构决定了它的查询频率,从1到255ms之间,这种传输方式典型的应用在少量的分散的,不可预测数据的传输,键盘,操纵杆和鼠标就属于这一类型中断方式传输是单向的并且对于host,来说只有输入的方式。

4、大量(bulk)传输,主要应用在数据大量传输传输和接受数据上,同时又没有带宽和间隔时间要求的情况下,要求保证传输,打印机和扫描仪属于这种类型,这种类型的设备适合于传输非常慢和大量被延迟的传输,可以等到所有其它类型的数据的传输完成之后再传输和接收数据。

USB将其有效的带宽分成各个不同的帧(frame),每帧通常是1ms时间长,每个设备每帧只能传输一个同步的传输包,在完成了系统的配置信息和连接之后,USB的host就会对不同的传输点和传输方式做一个统筹安排,用来适应整个的USB的带宽,通常情况下,同步方式和中断方式的传输会占据整个带宽的90%,剩下的就安排给控制方式传输数据。

函数有为control传输留有函数:

1
func (d *Device) Control(rType uint8, request uint8, val uint16, idx uint16, data []byte) (int, error)

参数的填写需要对照数据手册:USB Control Transfers Overview。这里头就有几张表记录着这些参数的对照。

热插拔

热插拔的使用在这个issue中被介绍,Hot Plug Support,可以参考,使用也很简单,这插一段简单使用的代码。

值得注意的是,注册热插拔函数后,热插拔函数会自动去扫描USB设备,然后触发注册的热插拔处理函数,也就是说,我的系统有三个usb设备,在注册完函数后,其会被自动调用三次,也就说可以在被触发函数中open设备,evt.DeviceDesc()可以获取pidvid

1
2
3
4
5
6
7
ctx.RegisterHotplug(func(evt gousb.HotplugEvent) {
if evt.Type() == gousb.HotplugEventDeviceArrived {
fmt.Println("arrived device", evt.Type())
} else {
fmt.Println("un-arrived device", evt.Type())
}
})